How to Merge From One Branch to Another
Merging only one file from a git branch (patching)
![]()
Say you have branches for different aspects of the same project and you want to merge only a single file (e.g. the configuration file). Short of copy-pasting all the changes by hand, how might you approach this problem?
The Problem
So we have a branch. This branch contains an update, bug-fix or enchantment and we wish to pass that on to all our other branches. This can be for reasons that you want to keep a testing copy or share information between code that no longer has the same function between different parts of the same repository.
Here m erging the entire body of code is impractical and overwriting the chosen file (e.g. with git checkout <branchname> <file> ) is counter-productive. So how else can we achieve such a feat? Well, the answer is simple and comes in the form of a --patch within git's checkout function.
The Solution
To start we begin by creating a new branch. This is good practice as it reduces the likeliness of something going wrong with our existing code.
git checkout -b mypatch Choosing a file to merge
Next, we note down the branch name of our updated file and its location. This allows us to insert it into our current directory using
git checkout --patch fix_branch folder1/update.txt If we forget to include the --patch argument the current file will be overwritten by that within the ' fix_branch '.
Our options
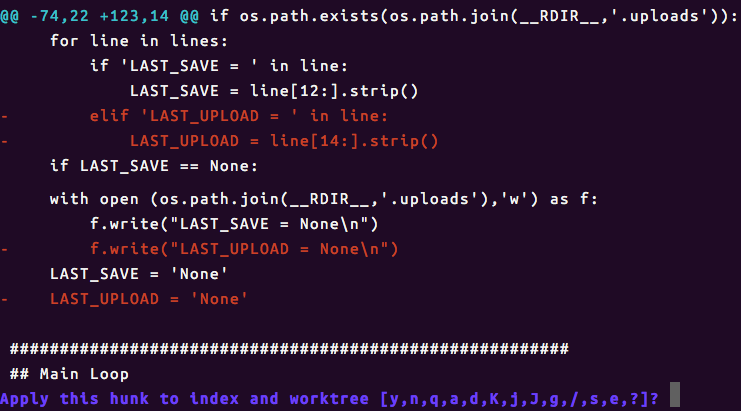
After running the command our file is separated into sections (called husks). Here the changes (difference) within each section are shown and you are asked to decide what to do with them.

Although there are many available options, you only really need to know three to get started. These are:
- y : Yes, implement all the changes shown
- n : No, I want to keep the file as it is
- e : Edit, I wish to pick which changes to keep
Using the Editor
By default, the editor that will be opened is vim. Here we get the same segment of code displayed, but with an option to edit sections of it. For example, our files may have had the following change:
            # this file only contains a staus                          -              STATUS = idle
              +              STATUS = engaged
Here the local file has its status set as 'idle' when the updated version has it as 'engaged'. The + and - signs denote that we wish to remove the line STATUS = idle and add the line STATUS = engaged to our text file.
Keeping the Change
If we want to keep the code that is being added, and/or removed we do not need to do anything but save the file.
Ignoring a Code Addition
If the updated file contains a line of code we do not wish to merge, we need to prefix the + sign with a # comment character. Anything prefixed with a # will not be merged into the file.
            + added change
#+ ignored add change
Skipping a Code Retraction
If we do not wish to have a line of code removed, we need to replace the - sign with a whitespace character ' ' .
            - removed line
              removed line (being kept)
Accidental Changes
It is worth noting that any edits to the file should be done after the merge and not within the hunks themselves. If you disrupt the formatting of a file you will get an error in the following format;
error: corrupt patch at line 74 Your edited hunk does not apply. Edit again (saying "no" discards!) [y/n]? y
Here we have changed something on line 74 and need to redo the whole file again. If you are merging something with many changes — this gets frustrating and fast!
Saving and pushing the changes
Once we have chosen which changes to keep, and which to discard, we can save our file ( escape the :wq in vim).
At this stage, it is important to review the changes and ensure the code works as it was originally intended.
Add ( git add -A ), commit ( git commit -m 'my merged file' ) and push ( git push ). In having updated our branch we now submit a pull request to update the original branch with our work, having just merged an individual file from another branch.
In Conclusion
We can use git checkout for far more than simply changing branches. If we supply it with a branch name and a file, we can replace a corrupted or broken file. Instead, if we want to pass some of the changed content we can use the --patch flag to manually merge an individual file. Just remember not to make any changes until we have finished the merge.
How to Merge From One Branch to Another
Source: https://towardsdatascience.com/merging-only-one-file-from-a-git-branch-patching-3a9b5a9c3fa6
0 Response to "How to Merge From One Branch to Another"
Post a Comment